Posted January 26, 2021
StageHand offers two menus. The primary (or main) navigation and the secondary (or eyebrow) navigation.
The primary navigation refers to the main, largest menu in the header — including Details, Kitchen Sink, Instructions, and Contact on this demo site. The secondary navigation is above the primary navigation, sitting on top of it like an eyebrow. It includes Active Users and Resource Center on this site.

Editing the Site Menus
To update your menu, go to Appearance > Menus in the lefthand navigation on the WordPress dashboard.
At the top of the page, select the menu you would like to update in the dropdown that says ‘Select a menu to edit:’ and click ‘Select’. (Be sure to actually hit ‘Select’ to see these menu items populate below.)

Now you can start adding or editing menu items.
Adding Menu Items
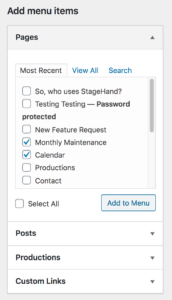
To add a page, check ✔️ the desired page in the ‘Add menu items’ section on the left. Scroll to find the desired page or use the ‘Search’ tab to type in what you are looking for.
Once the desired page(s) is selected, click the ‘Add to Menu’ button and they will be added to the very bottom of the menu list.
You can also add posts, productions, and/or custom links to the menus. To do so, simply expand the desired content type and follow the same steps as above.
Note: if you are not seeing the Posts or Productions here, expand the ‘Screen Options’ in the top right corner of your screen and toggle on whatever content types you wish to include.
Editing Menu Items
After a menu item has been added, you have several options to customize it and the menu.
Reorder — You can drag and drop menu items to reorder them. You can also create submenu items by selecting a menu item below the desired parent menu item and dragging it slightly to the right until a dotted line appears as seen in the screenshot below. It should snap into place, leaving it slightly indented.
Note: The primary menu is only styled to allow a single tier of subnavigation. The secondary menu is not styled to allow subnavigation. If you add a tier beyond these, the style and function may not work properly.
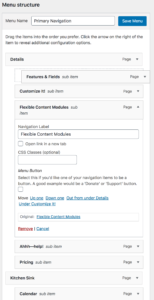 Change Text — To change the label for an item, expand the menu item and update the ‘Navigation Label’ to the desired text.
Make A Button — To make a menu item a button, such as the Contact button in the primary menu above, expand the menu item and check ✔️ the ‘Menu Button’ option.
This is often used for Contact or Donate buttons, or any menu item that you wish to prioritize.
Open in New Tab — If you want a menu item to open in a new tab, expand the menu item and check ✔️ the ‘Open link in a new tab’ option.
Remove an Item — To remove a menu item, expand and click the red ‘Remove’ link in the bottom left corner of the menu item box.
When you have added and edited all the desired menu items, select ‘Save Menu’.
Note: To change the styles for the primary or secondary navigation item, visit the Customizer for typography, color, size, and other style options.